3. Tier 3 Server/Application Configuration
3.1. Microsoft Windows 7, 8, 10 Audit Settings and Recommendations (PCI Compliant)
3.1.1. Accessing Audit Settings
If a Domain Controller isn’t managing the windows computers on the network, the Audit Policies can be modified on each individual computer. It is required to log into the computer as Local Administrator.
To configure audit policy settings follow the following steps:
Click Start, click on Administrative Tools, and then click Local Security Policy.
Double-click Security Settings, double-click Advanced Audit Policy Configuration, and then double-click System Audit Policies.
Using the tables below, Modify each audit object using either baseline recommendations or stronger recommendations.
To modify a audit object, Double click on the object, Check ‘Configure the following audit events:’ Mark Success or Failure as recommended in the tables.
To ensure that Advanced Audit Policy Configuration settings are not overwritten follow the following steps:
Click Start, click on Administrative Tools, and then click Local Security Policy.
Double-click Security Settings, double-click Local Polices, and then click Security Options.
Double-click Audit: Force audit policy subcategory settings (Windows Vista or later) to override audit policy category settings.
Click Enabled, and then click OK.
3.1.2. Recommended Audit Policies by Operating System
This section contains tables that list the audit setting recommendations that apply to the following operating systems:
Windows 7
Windows 8
Windows 10
These tables contain the Windows default setting, the baseline recommendations, and the stronger recommendations for these operating systems.
3.1.3. Audit Policy Tables Legend
Notation |
Recommendation |
|---|---|
YES |
Enable in general scenarios |
NO |
Do not enable in general scenarios |
IF |
Enable if needed for a specific scenario, or if a role or feature for which auditing is desired on the machine |
DC |
Enable on domain controllers |
[Blank] |
No recommendation |
3.1.4. Account Logon
Audit Policy Category or Subcategory |
Windows Default (success/failure) |
|
|
|---|---|---|---|
Audit Credential Validation |
No/No |
Yes/Yes |
Yes/Yes |
Audit Kerberos Authentication Service |
Yes/Yes |
||
Audit Kerberos Service Ticket Operations |
Yes/Yes |
||
Audit Other Account Logon Events |
Yes/Yes |
3.1.5. Account Management
Audit Policy Category or Subcategory |
Windows Default (success/failure) |
|
|
|---|---|---|---|
Audit Application Group Management |
Yes/Yes |
Yes/Yes |
|
Audit Computer Account Management |
Yes/Yes |
Yes/Yes |
|
Audit Distribution Group Management |
|||
Audit Other Account Management Events |
Yes/Yes |
Yes/Yes |
|
Audit Security Group Management |
Yes/Yes |
Yes/Yes |
|
Audit User Account Management |
Yes/No |
Yes/Yes |
Yes/Yes |
3.1.6. Detailed Tracking
Audit Policy Category or Subcategory |
Windows Default (success/failure) |
|
|
|---|---|---|---|
Audit DPAPI Activity |
Yes/Yes |
||
Audit Process Creation |
Yes/No |
Yes/Yes |
|
Audit Process Termination |
|||
Audit RPC Events |
|||
DS Access |
|||
Audit PNP Activity |
Yes/No |
Yes/No |
|
Audit Detailed Directory Service Replication |
|||
Audit Directory Service Access |
|||
Audit Directory Service Changes |
|||
Audit Directory Service Replication |
3.1.7. Logon and Logoff
Audit Policy Category or Subcategory |
Windows Default (success/failure) |
|
|
|---|---|---|---|
Audit Account Lockout |
Yes/No |
Yes/Yes |
|
Audit User/Device Claims |
|||
Audit IPsec Extended Mode |
|||
Audit IPsec Main Mode |
IF/IF |
||
Audit IPsec Quick Mode |
|||
Audit Logoff |
Yes/No |
Yes/No |
Yes/No |
Audit Logon |
Yes/No |
Yes/Yes |
Yes/Yes |
Audit Network Policy Server |
Yes/Yes |
||
Audit Other Logon/Logoff Events |
|||
Audit Special Logon |
Yes/No |
Yes/Yes |
Yes/Yes |
3.1.8. Object Access
Audit Policy Category or Subcategory |
Windows Default (success/failure) |
|
|
|---|---|---|---|
Audit Application Generated |
|||
Audit Certification Services |
|||
Audit Detailed File Share |
|||
Audit File Share |
|||
Audit File System |
|||
Audit Filtering Platform Connection |
|||
Audit Filtering Platform Packet Drop |
|||
Audit Handle Manipulation |
|||
Audit Kernel Object |
|||
Audit Other Object Access Events |
|||
Audit Registry |
|||
Audit Removable Storage |
Yes/Yes |
Yes/Yes |
|
Audit SAM |
|||
Audit Central Access Policy Staging |
3.1.9. Policy Change
Audit Policy Category or Subcategory |
Windows Default (success/failure) |
|
|
|---|---|---|---|
Audit Audit Policy Change |
Yes/No |
Yes/Yes |
Yes/Yes |
Audit Authentication Policy Change |
Yes/No |
Yes/No |
Yes/Yes |
Audit Authorization Policy Change |
|||
Audit Filtering Platform Policy Change |
|||
Audit MPSSVC Rule-Level Policy Change |
Yes |
||
Audit Other Policy Change Events |
3.1.10. Privilege Use
Audit Policy Category or Subcategory |
Windows Default (success/failure) |
|
|
|---|---|---|---|
Audit Non Sensitive Privilege Use |
|||
Audit Other Privilege Use Events |
|||
Audit Sensitive Privilege Use |
Yes/Yes |
Yes/Yes |
3.1.11. System
Audit Policy Category or Subcategory |
Windows Default (success/failure) |
|
|
|---|---|---|---|
Audit IPsec Driver |
Yes/Yes |
Yes/Yes |
|
Audit Other System Events |
Yes/Yes |
Yes/Yes |
|
Audit Security State Change |
Yes/No |
Yes/Yes |
Yes/Yes |
Audit Security System Extension |
Yes/Yes |
Yes/Yes |
|
Audit System Integrity |
Yes/Yes |
Yes/Yes |
Yes Yes |
3.1.12. Global Object Access Auditing
Audit Policy Category or Subcategory |
Windows Default (success/failure) |
|
|
|---|---|---|---|
Audit IPsec Driver |
|||
Audit Other System Events |
|||
Audit Security State Change |
|||
Audit Security System Extension |
|||
Audit System Integrity |
3.2. Windows Server 2008 to Windows Server 2019 Audit Settings Recommendations (PCI Compliant)
3.2.1. Accessing Audit Settings
It is required to log into the domain controller as a domain administrator.
To configure audit policy settings follow the following steps:
Click Start, click on Administrative Tools, and then click Group Policy Management.
In the console tree, double-click Forest: <your domain>, double-click Domains, and then double-click <your domain>.
Right-click Default Domain Policy, and then click Edit.
Double-click Computer Configuration, double-click Policies, and then double-click Windows Settings.
Double-click Security Settings, double-click Advanced Audit Policy Configuration, and then double-click Audit Policies.
Using the tables below, Modify each audit object using either baseline recommendations or stronger recommendations.
To modify a audit object, Double click on the object, Check ‘Configure the following audit events:’ Mark Success or Failure as recommended in the tables.
To ensure that Advanced Audit Policy Configuration settings are not overwritten follow the following steps:
Click Start, click on Administrative Tools, and then click Group Policy Management.
In the console tree, double-click Forest: <your domain>, double-click Domains, and then double-click <your domain>.
Right-click Default Domain Policy, and then click Edit.
Double-click Computer Configuration, double-click Policies, and then double-click Windows Settings.
Double-click Security Settings, double-click Local Polices, and then click Security Options.
Double-click Audit: Force audit policy subcategory settings (Windows Vista or later) to override audit policy category settings, and then click Define this policy setting.
Click Enabled, and then click OK.
3.2.2. Recommended Audit Policies by Operating System
This section contains tables that list the audit setting recommendations that apply to the following operating systems:
Windows Server 2008
Windows Server 2012
Windows Server 2012 R2
Windows Server 2016
Windows Server 2019
These tables contain the Windows default setting, the baseline recommendations, and the stronger recommendations for these operating systems.
3.2.3. Audit Policy Tables Legend
Notation |
Recommendation |
|---|---|
YES |
Enable in general scenarios |
NO |
Do not enable in general scenarios |
IF |
Enable if needed for a specific scenario, or if a role or feature for which auditing is desired on the machine |
DC |
Enable on domain controllers |
[Blank] |
No recommendation |
3.2.4. Account Logon
Audit Policy Category or Subcategory |
Windows Default (success/failure) |
|
|
|---|---|---|---|
Audit Credential Validation |
No/No |
Yes/Yes |
Yes/Yes |
Audit Kerberos Authentication Service |
Yes/Yes |
||
Audit Kerberos Service Ticket Operations |
Yes/Yes |
||
Audit Other Account Logon Events |
Yes/Yes |
3.2.5. Account Management
Audit Policy Category or Subcategory |
Windows Default (success/failure) |
|
|
|---|---|---|---|
Audit Application Group Management |
Yes/Yes |
Yes/Yes |
|
Audit Computer Account Management |
Yes/Yes |
Yes/Yes |
|
Audit Distribution Group Management |
|||
Audit Other Account Management Events |
Yes/Yes |
Yes/Yes |
|
Audit Security Group Management |
Yes/Yes |
Yes/Yes |
|
Audit User Account Management |
Yes/No |
Yes/Yes |
Yes/Yes |
3.2.6. Detailed Tracking
Audit Policy Category or Subcategory |
Windows Default (success/failure) |
|
|
|---|---|---|---|
Audit DPAPI Activity |
Yes/Yes |
||
Audit Process Creation |
Yes/Yes |
Yes/Yes |
|
Audit Process Termination |
Yes/Yes |
||
Audit RPC Events |
Yes/Yes |
3.2.7. DS Access
Audit Policy Category or Subcategory |
Windows Default (success/failure) |
|
|
|---|---|---|---|
Audit Detailed Directory Service Replication |
|||
Audit Directory Service Access |
DC/DC |
DC/DC |
|
Audit Directory Service Changes |
DC/DC |
DC/DC |
|
Audit Directory Service Replication |
3.2.8. Logon and Logoff
Audit Policy Category or Subcategory |
Windows Default (success/failure) |
|
|
|---|---|---|---|
Audit Account Lockout |
Yes/Yes |
Yes/Yes |
|
Audit User/Device Claims |
|||
Audit IPsec Extended Mode |
|||
Audit IPsec Main Mode |
IF/IF |
||
Audit IPsec Quick Mode |
|||
Audit Logoff |
Yes/No |
Yes/No |
Yes/No |
Audit Logon |
Yes/No |
Yes/Yes |
Yes/Yes |
Audit Network Policy Server |
Yes/Yes |
||
Audit Other Logon/Logoff Events |
Yes/Yes |
Yes/Yes |
|
Audit Special Logon |
Yes/No |
Yes/No |
Yes/Yes |
3.2.9. Object Access
Audit Policy Category or Subcategory |
Windows Default (success/failure) |
|
|
|---|---|---|---|
Audit Application Generated |
Yes/Yes |
||
Audit Certification Services |
Yes/Yes |
||
Audit Detailed File Share |
Yes/No |
||
Audit File Share |
Yes/Yes |
||
Audit File System |
|||
Audit Filtering Platform Connection |
|||
Audit Filtering Platform Packet Drop |
|||
Audit Handle Manipulation |
|||
Audit Kernel Object |
|||
Audit Other Object Access Events |
Yes/Yes |
||
Audit Registry |
Yes/No |
||
Audit Removable Storage |
Yes/Yes |
Yes/Yes |
|
Audit SAM |
|||
Audit Central Access Policy Staging |
Yes/Yes |
3.2.10. Policy Change
Audit Policy Category or Subcategory |
Windows Default (success/failure) |
|
|
|---|---|---|---|
Audit Audit Policy Change |
Yes/No |
Yes/Yes |
Yes/Yes |
Audit Authentication Policy Change |
Yes/No |
Yes/No |
Yes/Yes |
Audit Authorization Policy Change |
Yes/No |
Yes/Yes |
|
Audit Filtering Platform Policy Change |
|||
Audit MPSSVC Rule-Level Policy Change |
Yes/No |
||
Audit Other Policy Change Events |
Yes/Yes |
3.2.11. Privilege Use
Audit Policy Category or Subcategory |
Windows Default (success/failure) |
|
|
|---|---|---|---|
Audit Non Sensitive Privilege Use |
|||
Audit Other Privilege Use Events |
|||
Audit Sensitive Privilege Use |
Yes/Yes |
Yes/Yes |
3.2.12. System
Audit Policy Category or Subcategory |
Windows Default (success/failure) |
|
|
|---|---|---|---|
Audit IPsec Driver |
Yes/Yes |
Yes/Yes |
|
Audit Other System Events |
Yes/Yes |
||
Audit Security State Change |
Yes/No |
Yes/Yes |
Yes/Yes |
Audit Security System Extension |
Yes/Yes |
Yes/Yes |
|
Audit System Integrity |
Yes/Yes |
Yes/Yes |
Yes/Yes |
3.2.13. Global Object Access Auditing
Audit Policy Category or Subcategory |
Windows Default (success/failure) |
|
|
|---|---|---|---|
Audit IPsec Driver |
|||
Audit Other System Events |
|||
Audit Security State Change |
|||
Audit Security System Extension |
|||
Audit System Integrity |
3.3. Microsoft Windows 2000, 2003, 2008 Server, Microsoft Windows 7, XP, Vista
3.3.1. Agent-based Installation
Download and install Windows 32bit HAWK Agent as an administrator on the target system.
Edit the hawk_agent.cfg for any specific files, folders or EventLog sources where logging will be required.
Additionally, specify the remote syslog host and protocol meant for communication
Save the configuration file
Close the configuration file; the installer will automatically restart the HAWK Log & Event Collection Agent
Installation is now complete.
Note
To double check the client is running you can check for the ‘’hawk_agent.exe’’ process under Task Manager
Sample configuration below:
#
# HAWK Agent Configuration File
#
# HAWK Network Defense, Inc. - 2007
#

RemoteHost="localhost"
RemotePort="514"
#Remote Service options: TCP, UDP, TCP-SSL
RemoteService="UDP"

# Enable Automatic Log Rotation
LogRotation="0"
# In megabytes
LogRotationSize="5"

EnablePerformance="1"
PerformanceMonitorPollingTimeout="300"

#############################################################################
#
#                        Begin Log File Configuration
#
#############################################################################

# HAWK Log File
#LogFile="C:\Program Files\HAWK\Agent\hawkagentd.log"

# Cerberus FTP Configuration
LogFile="C:\Program Files\Cerberus\logs\cerberus.log"

# Microsoft Windows Firewall
# To enable, open your network connection properties and go to the Advanced tab
# here is a Settings button on the Advanced tab that causes a second property sheet to appear with three tabs:
#       Select: Security Logging
#       Go into Security Logging and switch on logging for both dropped packets and successful connections.
LogFile="C:\WINDOWS\pfirewall.log"
LogFile="C:\WINNT\pfirewall.log"


############################################################
# IIS Configuration
############################################################

# WINNT/2000/2003
#LogDirectory="C:\WINNT\system32\LogFiles\W3SVC1"
#LogDirectory="C:\WINNT\system32\LogFiles\W3SVC2"
#LogDirectory="C:\WINNT\system32\LogFiles\SMTPSVC1"
#LogDirectory="C:\WINNT\system32\LogFiles\SMTPSVC2"


# WinXP
#LogDirectory="C:\WINDOWS\system32\LogFiles\W3SVC1"
#LogDirectory="C:\WINDOWS\system32\LogFiles\W3SVC1"
#LogDirectory="C:\WINDOWS\system32\LogFiles\SMTPSVC1"
#LogDirectory="C:\WINDOWS\system32\LogFiles\SMTPSVC2"


############################################################
# HIDS Configuration
############################################################

# Cimcor CimTrak HIDS Configuration
#LogDirectory="C:\Program Files\Cimcor\CimTrak Server\WTLogs"

# Sophos Anti-Virus Configuration
#LogFile="C:\Program Files\Sophos Anti-Virus\sweep.log"
#LogFile="C:\Program Files\Sopho\AutoUpdate\Logs\aic.log"
#LogDirectory="C:\Program Files\Sophos\Remote Management System\Agent\Logs"
#LogDirectory="C:\Program Files\Sophos\Remote Management System\Router\Logs"
#LogDirectory="C:\WINNT\Profiles\All Users\Application Data\Sophos\Remote Management System\3\Agent\Logs"
#LogDirectory="C:\WINNT\Profiles\All Users\Application Data\Sophos\Remote Management System\3\Router\Logs"

#LogDirectory="C:\Documents and Settings\All Users\Application Data\Sophos\Sophos Anti-Virus\logs"
#LogDirectory="C:\Documents and Settings\All Users\Application Data\Sophos\Remote Management System\3\Agent\Logs"
#LogDirectory="C:\Documents and Settings\All Users\Application Data\Sophos\Remote Management System\3\Router\Logs"

# Sophos Management Server
#LogDirectory="C:\Documents and Settings\All Users\Application Data\Sophos\Remote Management System\3\EMLib\Logs"
#LogDirectory="C:\Program Files\Sophos\Remote Management System\EMLib\Logs"
#LogDirectory="C:\Program Files\Sophos\Enterprise Console\CertificationManager\Logs"

# ClamAV Windows Antivirus Configuration
#LogDirectory="C:\Documents and Settings\All Users\.clamwin\log"


#############################################################################
#
#                       Begin EventLog Configuration
#
#############################################################################

EnableWMIEvents="1"

############################################################
# Microsoft Windows Base Source
############################################################
EventLogSource="Application"
EventLogSource="Security"
EventLogSource="System"


############################################################
# Microsoft Office Source
############################################################
#EventLogSource="Microsoft Office Diagnostics"
#EventLogSource="Microsoft Office Sessions"
Note
You can only send logs to one destination.
3.3.1.1. Reload Configuration
In order to reload any changes in configuration you have to start and stop the service.
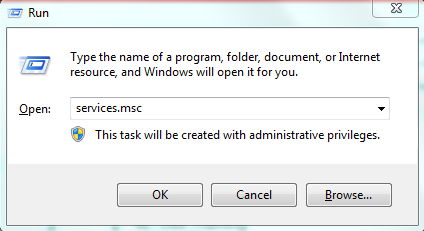
Click on .
Type in services.msc and click OK.
Find and select “HAWK Local Event Collection Agent” in the list on the right hand side.
Click on Restart the service
Note
Alternatively, You can open an administrative command dialogue and run the commands below:
net stop hawkagent
Then run:
net start hawkagent
3.3.2. Agent-based Upgrade
Download Windows 32bit HAWK Agent as an administrator on the target system.
Open an administrative command dialogue and run the commands below:
net stop hawkagent
HAWKAgentSetup-win32-${version}.exe /S
net start hawkagent
This will replace the existing service with the new updates, while maintaining the existing configuration files.
Note
The /S option will installs the agent in slient mode.
3.3.3. Agent-based Uninstall
Open an administrative command dialogue and run the command below:
net stop hawkagent
Go to
Find and select HAWK Agent (remove only)
Click Uninstall/Chagne
A HAWK Agent Uninstall Confirmation window will open, Click Uninstall.
Note
Uninstalling will leave the HAWK folder in ‘Program Files (x86)’. There are two files that are used to track the files being monitored. If you don’t plan to re-install the HAWK Agent you can remove this HAWK folder.
3.3.4. SNARE Agent
Snare for Windows is a Windows XP, Vista, Windows 2003, Windows 7, 8, 8.1, Windows 2008/2008 R2, Windows 2012/2012 R2 compatible service that interacts with the underlying Windows Eventlog subsystem to facilitate remote, real-time transfer of event log information. Log data is converted to text format, and delivered to a remote Snare Server, remote SIEM server or to a remote Syslog server with configurable and dynamic facility and priority settings.
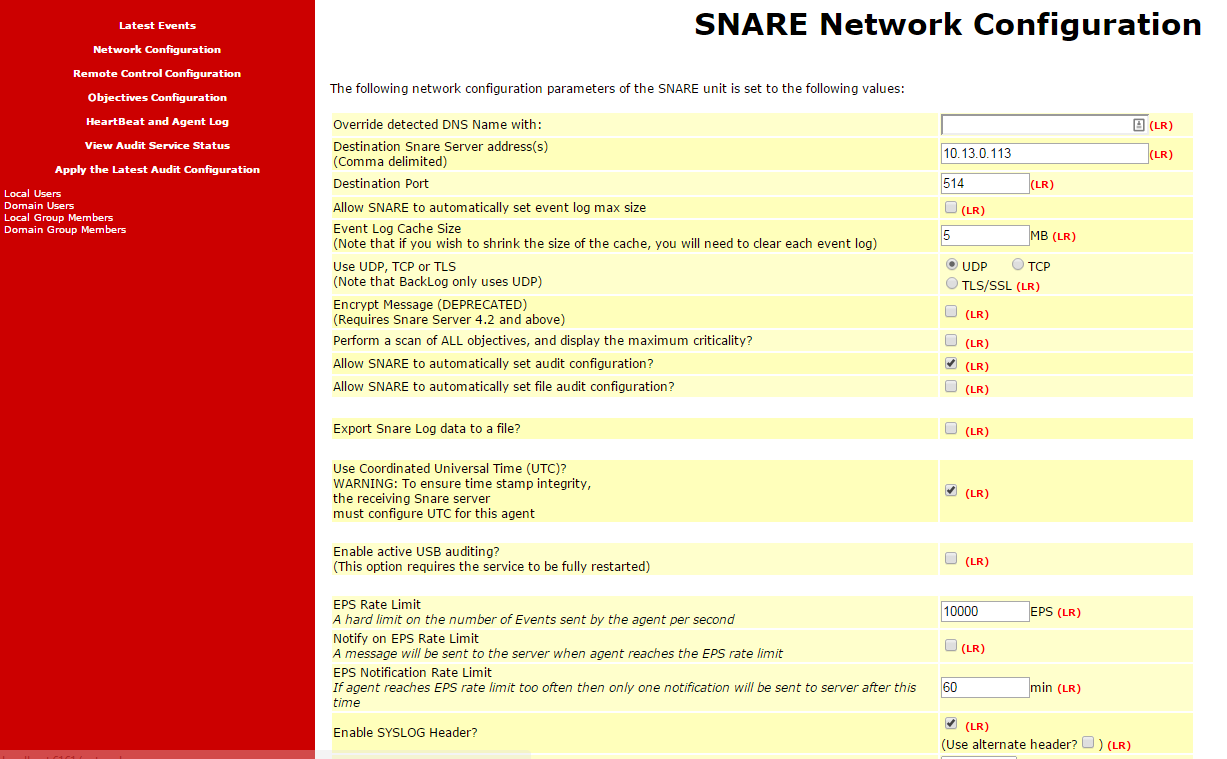
Configure Snare to send data to HAWK eyeCon 5.0
One you install the software, go to Network Configuration section. Configure the Destination Snare Server Address and Destination Port to point to your HAWK Engine address and port. Check Use Coordinated Universal Time (UTC) and Enable Syslog Header in the configuration.
Next we need to change Windows Log Delimiter.
Windows uses by default the tab character to separate the different fields in the log, you will need to change this delimiter and use “,” to allow HAWK eyeCon 5.0 to collect events
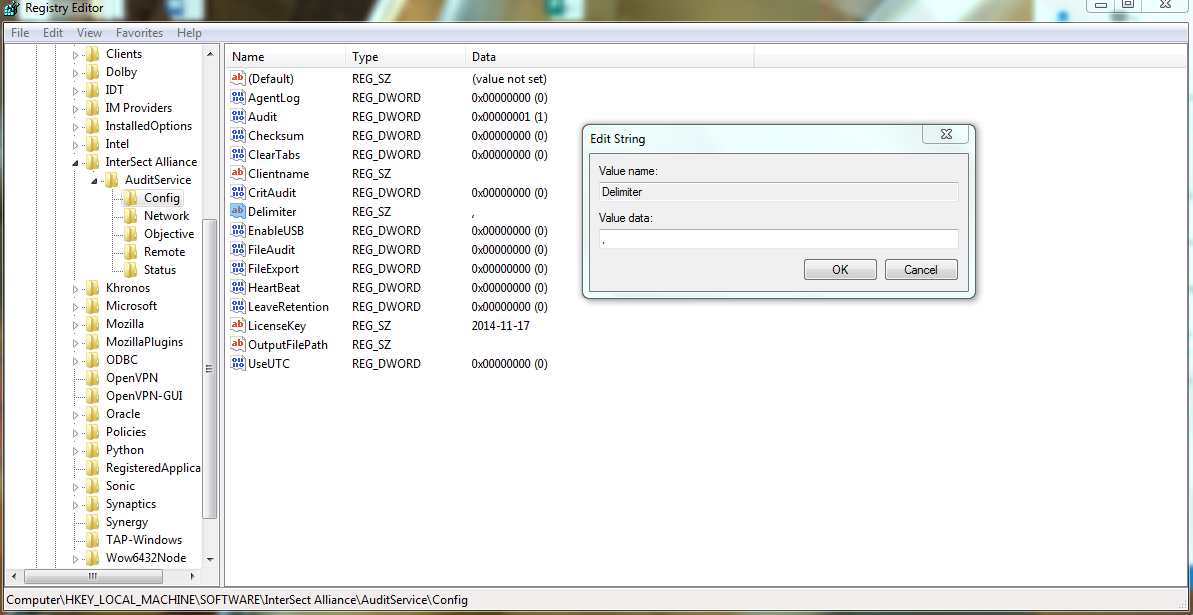
This delimiter can be changed in the Windows registry using the regedit tool.
Navigate to HKEY_LOCAL_MACHINESOFTWAREInterSect AllianceAuditServiceConfig
Double click on Delimiter and change the Value data field from a tab to a comma “,”.
Click OK
Close out of the Windows Registry Editor.
Restart the Snare Service.
Open an administrative command dialogue and run the commands below:
net stop snare
then type in:
net start snare
3.3.5. Microsoft Windows Remote Event Collector (WMI/WQL)
On the HAWK engine that is responsible for gathering information, enter the following commands:
user@host:# yum -y install hawk-ece-plugin-winnt
user@host:# service hawk-ece restart
On the navigation panel, click on .
In the Resource Administration section, Click on the button.
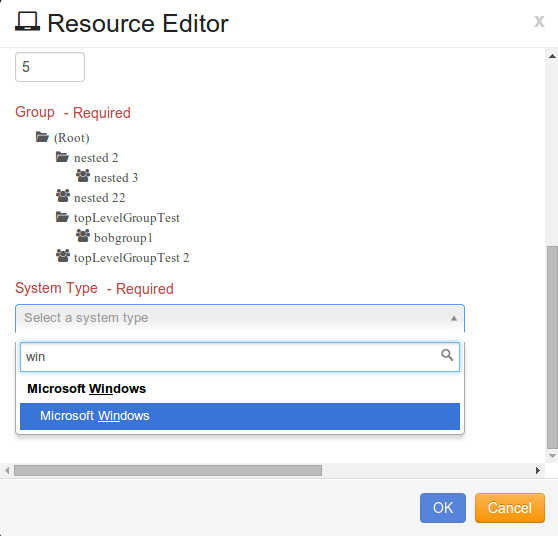
The Resource Editor opens, as shown:
Enter the Host name of the Resource.
Enter the IPv4 Network IP address for the Resource.
Enter the IPv6 Network IP address for the Resource (optional).
If the Resource is designated as a Compliance Asset, Click on the radio button by “True”, if the Resource is not designated as a Compliance Asset, Click on the Radio button next to “False”.
Enter the Criticality value for the Asset. There are five levels which identify the criticality of the asset, which are:
Level 1 - Critical/Sensitive Data (Highly sensitive and critical data)
Level 2 - High (very important data)
Level 3 - Moderate
Level 4 - Low
Level 5 - Very Low
Select the specific Group to which the new Resource is assigned.
At System Type, click on the drop-down arrow and Select “Microsoft Windows”.
Enter additional detailed notes in the Details/Notes section.
Click on tab.
Click on the button.
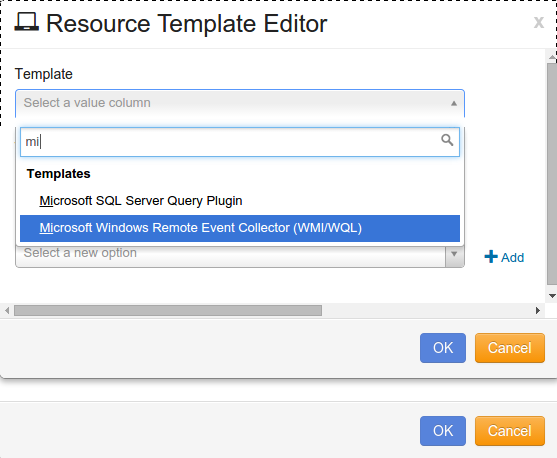
Resource Template Editor will open, as shown:
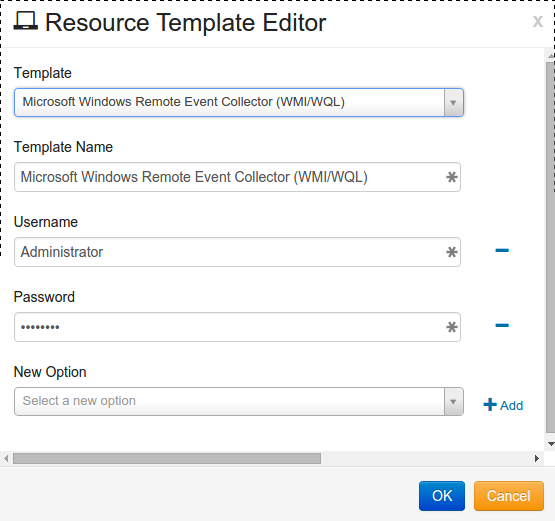
Click the drop-down arrow for Template, and select “Microsoft Windows Remote Event Collector (WMI/WQL)”.
Fill in the Username, and Password.
Note
Username can be either ‘admin’ or ‘DOMAIN\admin’.
Once finished click button to save your Resource template.
Click button again to save your resource.
Verify that its showing in the Resource Administration Table.
Note
The following TCP ports have to be open between the HAWK engine and the Window server: 135, 137, and 139
Note
In order for the Data Tier to decrypt and store the information correctly. Check hcpulse.cfg file on engines that are responsible for processing this Pulse Template. Insure hcpulse.cfg has the correct HTTPCredentialSecret value. It should match the “ENCRYPTION_KEY_PLAIN” in config.php located at ‘/var/www/hawk-data/htdocs/API/1.1/config.php’ on the hawk-data (API) server.
3.3.5.1. Configuring Windows server for WMI
You may need to set ACL’s for the WMI objects you are trying to access, using an administrative account, before you can access them via an unprivileged account.
Configure DCOM
On the server to be managed click Start, click Run, type DCOMCNFG, and then click OK.
In the Component Services dialog box, expand Component Services, expand Computers, and then right-click My Computer and click Properties.
In the My Computer Properties dialog box, click the COM Security tab.
Under Launch and Activation Permissions, click Edit Limits.
In the Launch Permission dialog box, select ‘Distributed COM Users’. In the Allow column under Permissions for User, select Remote Launch and select Remote Activation, and then click OK.
Under Access Permissions, click Edit Limits.
In the Access Permission dialog box, select ‘Distributed COM Users’. In the Allow column under Permissions for User, select Remote Access, and then click OK.
Add the user account to the Distributed COM Users Group in Computer Management, Local Users and Groups on the Server to be managed.
Add the user account to the Performance Log Users Group in Computer Management, Local Users and Groups on the Server to be managed.
Configure WMI
On the server to be managed click Start, click Run, type wmimgmt.msc, and then click OK.
In the console tree, right-click WMI Control, and then click Properties.
Click the Security tab.
Select the Root namespace and then click Security.
In the Security dialog box, click Add.
In the Select Users, Computers, or Groups dialog box, enter the user account. Click the Check Names button to verify your entry and then click OK.
In the Security dialog box, under Permissions, select ‘Enable Account’ and ‘Remote Enable’ for the user account.
Ensure the permissions propagate to all subnamespaces.
3.4. GNU/Linux Remote Syslog Configuration
Configuring a remote Unix operating system such as Solaris, BSD, and GNU/Linux may vary. The following instructions address the customized configuration of a popular GNU/Linux syslog daemon. This daemon’s configuration will vary with the specific syslog application and version used, and is suggested to consult any specific documentation related to remote syslog logging.
3.4.1. Syslog-NG Configuration
Download and extract the syslog-ng source
Install syslog-ng
user@host# cd syslog-ng-${version} && ./configure && make && make install
Install configuration scripts and configure system.
user@host# cp contrib/init.dt /etc/rc.d/init.d/syslog-ng
user@host# cp contrib/syslog-ng.conf /etc/syslog-ng/syslog-ng.conf
Test initial configuration:
user@host# /etc/rc.d/init.d/syslog stop
user@host# /etc/rc.d/init.d/syslog-ng start
Edit ‘’’/etc/logrotate.d/’’’ and replace “syslog” with “syslog-ng”
3.4.2. Syslog Configuration
On the system for which you wish to send log entries, modify the /etc/syslog.conf file
Add something similar to the following at the very bottom:
*.info @siemhost.mydomain.com
Restart syslog on this machine.
3.4.3. Agent-based Installation
3.4.3.1. CentOS and RHEL
Setup HAWK repo
user@host#: rpm -hiv http://www.hawkdefense.com/repos/hawk/5.0/RHEL6/noarch/hawk-repo-5.0.0-1.el6.noarch.rpm
Update yum.
user@host#: yum -y update
Install the HAWK Agent.
user@host#: yum -y install hawkagentd
Edit the /etc/hawkagentd.cfg for any specific files, folders or EventLog sources where logging will be required.
Additionally, specify the remote syslog host and protocol meant for communication
Save the configuration file
Close the configuration file
Start or Restart the hawkagentd process manually or via an init.d startup script.
3.4.3.2. HAWK-OS
Setup HAWK repo
user@host#: rpm -hiv http://www.hawkdefense.com/repos/hawk/5.0/HAWK4/noarch/hawk-repo-5.0.0-1.hwk4.noarch.rpm
Update yum.
user@host#: yum -y update
Install the HAWK Agent.
user@host#: yum -y install hawkagentd
Edit the /etc/hawkagentd.cfg for any specific files, folders or EventLog sources where logging will be required.
Additionally, specify the remote syslog host and protocol meant for communication
Save the configuration file
Close the configuration file
Start or Restart the hawkagentd process manually or via an init.d startup script.
3.4.3.3. Download and Install HAWK Agent
If HAWK system has already been deployed you can find all agents at
Download the appropriate package for your Operating System using the direct download links below:
Install the HAWK Agent.
For rpm packages use:
rpm -i hawkagentd-latest.*.rpm
For deb packages use:
dpkg -i hawkagentd-latest.*.deb
Edit the /etc/hawkagentd.cfg for any specific files, folders or EventLog sources where logging will be required.
Additionally, specify the remote syslog host and protocol meant for communication
Save the configuration file
Close the configuration file
Start or Restart the hawkagentd process manually or via an init.d startup script.
3.4.4. Agent-based Uninstall
3.4.4.1. HAWK Agent installed via HAWK Repository
Stop the HAWK Agent:
service hawkagentd stop
Uninstall the package:
yum remove hawkagentd -y
3.4.4.2. HAWK Agent installed via RPM Package
Stop the HAWK Agent:
service hawkagentd stop
Uninstall the package:
rpm -e –nodeps hawkagentd
3.4.4.3. HAWK Agent installed via Debian/Ubuntu Package
Stop the HAWK Agent:
sudo service hawkagentd stop
Uninstall the package:
sudo apt-get remove hawkagentd
3.5. Mac OS X Remote Syslog Configuration
Edit the /etc/syslog.conf file to include local4.none in the second line, and to redirect the output of “local4.*” to /var/log/[name].log (replace [name] with a name of your choice). There’s a sample syslog.conf file at end of this hint.
Create the Saved Logs folder in the desired location. In my example, it’s at the root of the Macintosh hard drive.
Back up the daemon file to the desktop:
sudo cp /System/Library/LaunchDaemons/com.apple.syslogd.plist ~/Desktop/
Here is the restore line, if you need it:
sudo cp ~/Desktop/com.apple.syslogd.plist /System/Library/LaunchDaemons/
Edit the plist using the nano Unix editor:
sudo nano /System/Library/LaunchDaemons/com.apple.syslogd.plist
Scroll down to this line: <string>/usr/sbin/syslogd</string> and add the following directly below it:
<string>-u</string>
Save and exit.
Use the following two lines to stop and restart the daemon:
sudo launchctl unload /System/Library/LaunchDaemons/com.apple.syslogd.plist
sudo launchctl load /System/Library/LaunchDaemons/com.apple.syslogd.plist
Create or edit the /etc/daily.local to rotate the logs and restart the service:
sudo nano /etc/daily.local
See sample daily.local at end of this document, and remember to modify the log storage location as desired.
SAMPLE /etc/syslog.conf
\*.err;kern.\*;auth.notice;authpriv,remoteauth.none;mail.crit  /dev/console
\*.notice;\*.info;authpriv,remoteauth,ftp.none;kern.debug;mail.crit;local4.none /var/log/system.log

# Send messages normally sent to the console also to the serial port.
# To stop messages from being sent out the serial port, comment out this line.
#*.err;kern.*;auth.notice;authpriv,remoteauth.none;mail.crit    /dev/tty.serial

# The authpriv log file should be restricted access; these
# messages shouldn't go to terminals or publically-readable
# files.
authpriv.*;remoteauth.crit                             /var/log/secure.log

lpr.info                                               /var/log/lpr.log
mail.*                                                 /var/log/mail.log
ftp.*                                                  /var/log/ftp.log
netinfo.err                                            /var/log/netinfo.log
local4.*                                               /var/log/whatevernameyoulike.log

# \*.emerg                                             *
SAMPLE /etc/daily.local – Change the username to your own username to give you rights to the saved log files.
/bin/mv /var/log/whatevernameyoulike.log /Volumes/Macintosh\ HD/Saved\ Logs/`/bin/date +%m%d%y`.txt

launchctl unload /System/Library/LaunchDaemons/com.apple.syslogd.plist
sleep 1
launchctl load /System/Library/LaunchDaemons/com.apple.syslogd.plist
3.6. FreeBSD, NetBSD, and OpenBSD Syslog Remote Logging
A logging client is a machine which sends log information to a logging server in addition to keeping local copies.
Similar to log servers, clients must also meet a few minimum requirements:
syslogd(8) must be configured to send messages of specific types to a log server, which must accept them;
The firewall must allow UDP packets through on port 514;
Both forward and reverse DNS must be configured or have proper entries in the /etc/hosts.
Client configuration is a bit more relaxed when compared to that of the servers.
The client machine must have the following listing placed inside /etc/rc.conf*
syslogd_enable="YES"
syslogd_flags="-s -v -v"
As before, these entries will enable the syslogd daemon on boot up, and increases the verbosity of logged messages. The -s option prevents logs from being accepted by this client from other hosts.
Facilities describe the system part for which a message is generated. For an example, ftp and ipfw are both facilities. When log messages are generated for those two services, they will normally include those two utilities in any log messages. Facilities are accompanied with a priority or level, which is used to mark how important a log message is. The most common will be the warning and info. Please refer to the syslog(3) manual page for a full list of available facilities and priorities.
The logging server must be defined in the client’s /etc/syslog.conf. In this instance, the @ symbol is used to send logging data to a remote server and would look similar to the following entry:
*.* @logserv.example.com
Once added, syslogd must be restarted for the changes to take effect:
user@host# /etc/rc.d/syslogd restart
3.7. Solaris Remote Syslog Configuration
The client system from which you want to log the messages to the remote server, needs to have an entry put in /etc/syslog.conf. This specifies the remote server (with the @ character):
*.* @8.8.8.8
This will send all messages to the remote 8.8.8.8 system. You can of course use any other facility.priority setting (kern.*, *.emerg, etc).
You need to restart the syslogd with:
user@host# service syslog reload
3.8. IBM AIX 5L/6 Remote Syslog Configuration
The client system from which you want to log the messages to the remote server, needs to have an entry put in /etc/syslog.conf. This specifies the remote server (with the @ character):
*.* @8.8.8.8
This will send all messages to the remote 8.8.8.8 system. You can of course use any other facility.priority setting (kern.*, *.emerg, etc).
You need to restart the syslogd with:
user@host# service syslog reload
3.9. McAfee ePolicy Orchestrator v4.0 and Below Configuration using SNMP
Open ePolicy Orchestrator (ePO).
Under McAfee Security on the left pane, expand ePolicy Orchestrator and your ePO host, and then click Notifications.
On the Notifications pane, click the Configuration tab.
Enter the host name of your HAWK Event Correlation Engine in the Name field.
Enter the host of your HAWK Event Correlation Engine in the Server address field.
Click OK.
3.10. McAfee ePolicy Orchestrator v4.5+ Reporting Configuration using SNMP
Open ePolicy Orchestrator (ePO).
Select :.
Select New Server.
- Complete the Registered Server Builder form:
In the Server type menu, select SNMP Server.
In the Name field, enter the hostname of your HAWK Event Correlation Engine appliance.
Click Next.
In the Address field, enter the hostname of your LEM appliance.
In the SNMP Version field, select SNMPv2c.
In the Security : Community field, enter public.
Click Save.
3.11. McAfee ePolicy Orchestrator using ODBC
On the HAWK engine that is responsible for gathering information, enter the following commands:
user@host:# yum -y install hawk-ece-plugin-epo
user@host:# service hawk-ece restart
On the navigation panel, click on .
In the Resource Administration section, Click on the button.
The Resource Editor opens, as shown:
Enter the Host name of the Resource.
Enter the IPv4 Network IP address for the Resource.
Enter the IPv6 Network IP address for the Resource (optional).
If the Resource is designated as a Compliance Asset, Click on the radio button by “True”, if the Resource is not designated as a Compliance Asset, Click on the Radio button next to “False”.
Enter the Critical value for the Asset. There are five levels which identify the criticality of the asset, which are:
Level 1 - Critical/Sensitive Data (Highly sensitive and critical data)
Level 2 - High (very important data)
Level 3 - Moderate
Level 4 - Low
Level 5 - Very Low
Select the specific Group to which the new Resource is assigned.
At System Type, click on the drop-down arrow and Select “Microsoft Windows”.
Enter additional detailed notes in the Details/Notes section.
Click on tab.
Click on the button.
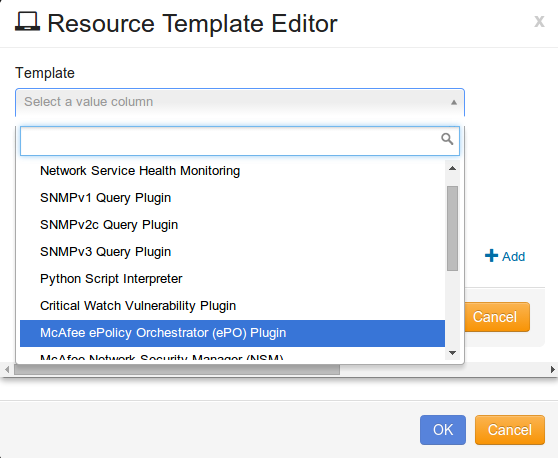
Resource Template Editor will open, as shown:
Click the drop-down arrow for Template, and select McAfee ePolicy Orchestrator (ePO) Plugin.
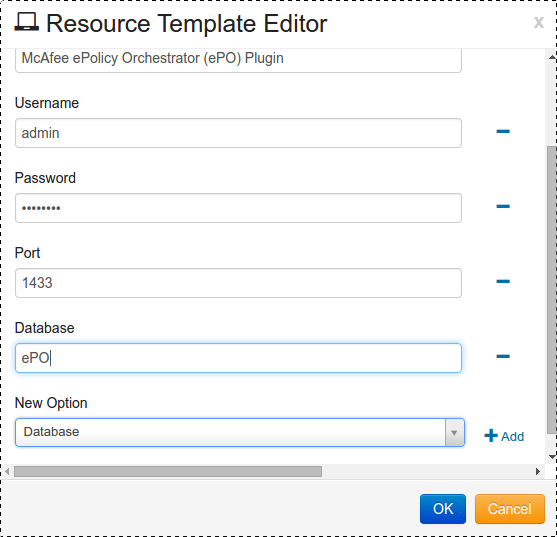
Fill in the Username, Password, and port number.
If the database name isn’t the default ‘ePO’. Select database under new option drop down menu and click button. This will create a new field named database. Enter in the correct ePO database name.
Once finished click button to save your Resource template.
Click button again to save your resource.
Verify that its showing in the Resource Administration Table.
Note
In order for the Data Tier to decrypt and store the information correctly. Check hcpulse.cfg file on engines that are responsible for processing this Pulse Template. Insure hcpulse.cfg has the correct HTTPCredentialSecret value. It should match the “ENCRYPTION_KEY_PLAIN” in config.php located at ‘/var/www/hawk-data/htdocs/API/1.1/config.php’ on the hawk-data (API) server.
3.12. McAfee NSM Poller Configuration
On the HAWK engine that is responsible for gathering information, enter the following commands:
user@host:# yum -y install hawk-ece-plugin-mcafee-nsm
user@host:# service hawk-ece restart
On the navigation panel, click on .
In the Resource Administration section, Click on the button.
The Resource Editor opens, as shown:
Enter the Host name of the Resource.
Enter the IPv4 Network IP address for the Resource.
Enter the IPv6 Network IP address for the Resource (optional).
If the Resource is designated as a Compliance Asset, Click on the radio button by “True”, if the Resource is not designated as a Compliance Asset, Click on the Radio button next to “False”.
Enter the Critical value for the Asset. There are five levels which identify the criticality of the asset, which are:
Level 1 - Critical/Sensitive Data (Highly sensitive and critical data)
Level 2 - High (very important data)
Level 3 - Moderate
Level 4 - Low
Level 5 - Very Low
Select the specific Group to which the new Resource is assigned.
At System Type, click on the drop-down arrow and Select “McAfee Intrusion Detection System”.
Enter additional detailed notes in the Details/Notes section.
Click on tab.
Click on the button.
Resource Template Editor will open, as shown:
Click the drop-down arrow for Template, and select McAfee Network Security Manager (NSM).
Fill in the Username, Password, Database, and port number. Once finished click button to save your Resource template.
Click button again to save your resource.
Verify that its showing in the Resource Administration Table.
Note
In order for the Data Tier to decrypt and store the information correctly. Check hcpulse.cfg file on engines that are responsible for processing this Pulse Template. Insure hcpulse.cfg has the correct HTTPCredentialSecret value. It should match the “ENCRYPTION_KEY_PLAIN” in config.php located at ‘/var/www/hawk-data/htdocs/API/1.1/config.php’ on the hawk-data (API) server.
3.13. Critical Watch
On the HAWK engine that is responsible for gathering information, enter the following commands:
user@host:# yum -y install hawk-ece-plugin-critical-watch
user@host:# yum -y install hawk-ece-plugin-python
user@host:# service hawk-ece restart
On the navigation panel, click on .
In the Resource Administration section, Click on the button.
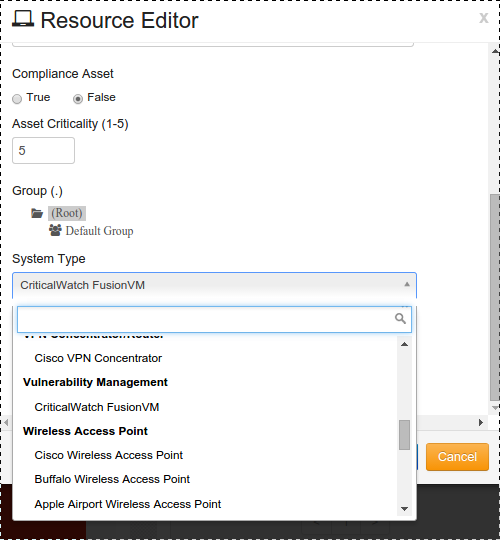
The Resource Editor opens, as shown:
Enter the Host name of the Resource.
Enter the IPv4 Network IP address for the Resource.
Enter the IPv6 Network IP address for the Resource (optional).
If the Resource is designated as a Compliance Asset, Click on the radio button by “True”, if the Resource is not designated as a Compliance Asset, Click on the Radio button next to “False”.
Enter the Critical value for the Asset. There are five levels which identify the criticality of the asset, which are:
Level 1 - Critical/Sensitive Data (Highly sensitive and critical data)
Level 2 - High (very important data)
Level 3 - Moderate
Level 4 - Low
Level 5 - Very Low
Select the specific Group to which the new Resource is assigned.
At System Type, click on the drop-down arrow and Select “CriticalWatch FusionVM”.
Enter additional detailed notes in the Details/Notes section.
Click on tab.
Click on the button.
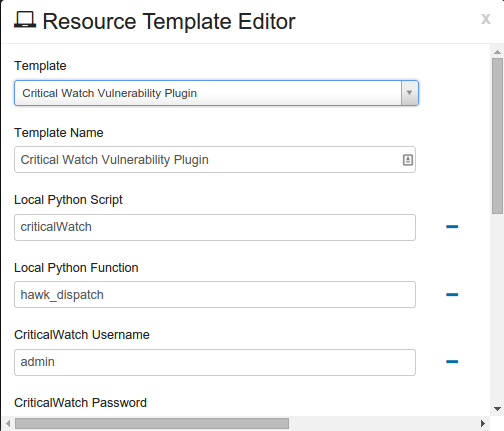
Resource Template Editor will open, as shown:
Click the drop-down arrow for Template, and select “Critical Watch Vulnerability Plugin”.
Edit your Template Name.
Local Python Script should say: “criticalWatch”
Local Python Function should say: “hawk_dispatch”
Fill in the CriticalWatch Username and Password.
Fill in the CriticalWatch FusionVM API Url. i.e. “https://api.fusionvm.com”
Enter HAWK API Url. i.e. “https://hawk-data-host:8080/API/1.1”
Enter in the HAWK API Username and Password:
Once finished click button to save your Resource template.
Click button again to save your resource.
Verify that its showing in the Resource Administration Table.
Note
In order for the Data Tier to decrypt and store the information correctly. Check hcpulse.cfg file on engines that are responsible for processing this Pulse Template. Insure hcpulse.cfg has the correct HTTPCredentialSecret value. It should match the “ENCRYPTION_KEY_PLAIN” in config.php located at ‘/var/www/hawk-data/htdocs/API/1.1/config.php’ on the hawk-data (API) server.
3.14. MicroSoft SQL
On the HAWK engine that is responsible for gathering information, enter the following commands:
user@host:# yum -y install hawk-ece-plugin-mssql
user@host:# service hawk-ece restart
On the navigation panel, click on .
In the Resource Administration section, Click on the button.
The Resource Editor opens, as shown:
Enter the Host name of the Resource.
Enter the IPv4 Network IP address for the Resource.
Enter the IPv6 Network IP address for the Resource (optional).
If the Resource is designated as a Compliance Asset, Click on the radio button by “True”, if the Resource is not designated as a Compliance Asset, Click on the Radio button next to “False”.
Enter the Critical value for the Asset. There are five levels which identify the criticality of the asset, which are:
Level 1 - Critical/Sensitive Data (Highly sensitive and critical data)
Level 2 - High (very important data)
Level 3 - Moderate
Level 4 - Low
Level 5 - Very Low
Select the specific Group to which the new Resource is assigned.
At System Type, click on the drop-down arrow and Select “Microsoft Windows”.
Enter additional detailed notes in the Details/Notes section.
Click on tab.
Click on the button.
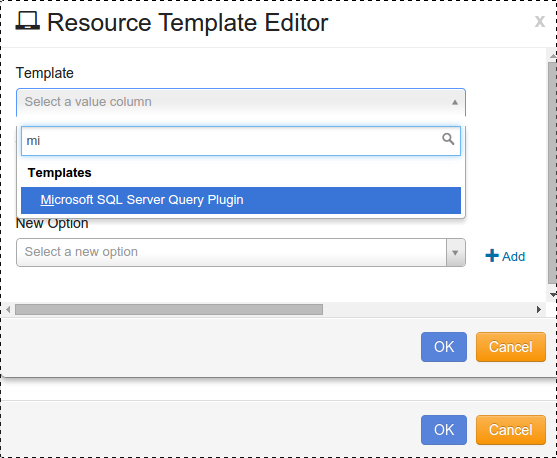
Resource Template Editor will open, as shown:
Click the drop-down arrow for Template, and select “Microsoft SQL Server Query Plugin”.
Edit your Template Name.
Fill in the MS-SQL Username and Password.
Enter in the MS-SQL Database name.
Enter in the MS-SQL Port number.
Enter the SQL Query to select the correct information.
Once finished click button to save your Resource template.
Click button again to save your resource.
Verify that its showing in the Resource Administration Table.
Note
In order for the Data Tier to decrypt and store the information correctly. Check hcpulse.cfg file on engines that are responsible for processing this Pulse Template. Insure hcpulse.cfg has the correct HTTPCredentialSecret value. It should match the “ENCRYPTION_KEY_PLAIN” in config.php located at ‘/var/www/hawk-data/htdocs/API/1.1/config.php’ on the hawk-data (API) server.
3.15. MySQL
On the HAWK engine that is responsible for gathering information, enter the following commands:
user@host:# yum -y install hawk-ece-plugin-mysql
user@host:# service hawk-ece restart
On the navigation panel, click on .
In the Resource Administration section, Click on the button.
The Resource Editor opens, as shown:
Enter the Host name of the Resource.
Enter the IPv4 Network IP address for the Resource.
Enter the IPv6 Network IP address for the Resource (optional).
If the Resource is designated as a Compliance Asset, Click on the radio button by “True”, if the Resource is not designated as a Compliance Asset, Click on the Radio button next to “False”.
Enter the Critical value for the Asset. There are five levels which identify the criticality of the asset, which are:
Level 1 - Critical/Sensitive Data (Highly sensitive and critical data)
Level 2 - High (very important data)
Level 3 - Moderate
Level 4 - Low
Level 5 - Very Low
Select the specific Group to which the new Resource is assigned.
At System Type, click on the drop-down arrow and Select The proper system type. .
Enter additional detailed notes in the Details/Notes section.
Click on tab.
Click on the button.
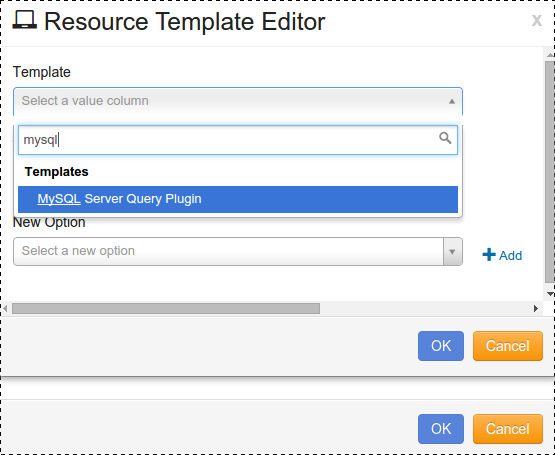
Resource Template Editor will open, as shown:
Click the drop-down arrow for Template, and select “MySQL Server Query Plugin”.
Edit your Template Name.
Fill in the MySQL Username and Password.
Enter in the MySQL Database name.
Enter in the MySQL Port number.
Enter the SQL Query to select the correct information.
Once finished click button to save your Resource template.
Click button again to save your resource.
Verify that its showing in the Resource Administration Table.
Note
In order for the Data Tier to decrypt and store the information correctly. Check hcpulse.cfg file on engines that are responsible for processing this Pulse Template. Insure hcpulse.cfg has the correct HTTPCredentialSecret value. It should match the “ENCRYPTION_KEY_PLAIN” in config.php located at ‘/var/www/hawk-data/htdocs/API/1.1/config.php’ on the hawk-data (API) server.
3.16. Tenable Nessus Vulnerability Plugin
On the HAWK engine that is responsible for gathering information, enter the following commands:
user@host:# yum -y install hawk-ece-plugin-nessus
user@host:# yum -y install hawk-ece-plugin-python
user@host:# service hawk-ece restart
On the navigation panel, click on .
In the Resource Administration section, Click on the button.
The Resource Editor opens, as shown:
Enter the Host name of the Resource.
Enter the IPv4 Network IP address for the Resource.
Enter the IPv6 Network IP address for the Resource (optional).
If the Resource is designated as a Compliance Asset, Click on the radio button by “True”, if the Resource is not designated as a Compliance Asset, Click on the Radio button next to “False”.
Enter the Critical value for the Asset. There are five levels which identify the criticality of the asset, which are:
Level 1 - Critical/Sensitive Data (Highly sensitive and critical data)
Level 2 - High (very important data)
Level 3 - Moderate
Level 4 - Low
Level 5 - Very Low
Select the specific Group to which the new Resource is assigned.
At System Type, click on the drop-down arrow and Select the proper system type.
Enter additional detailed notes in the Details/Notes section.
Click on tab.
Click on the button.
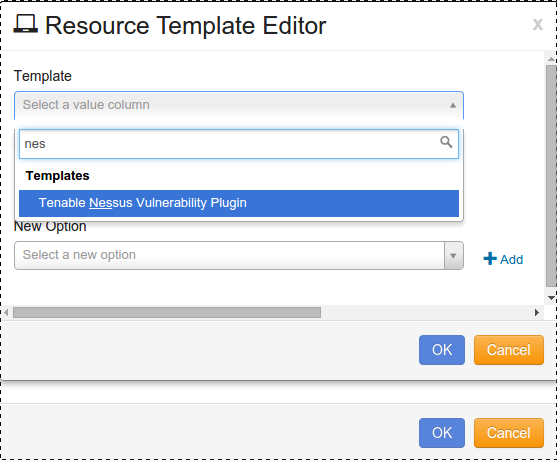
Resource Template Editor will open, as shown:
Click the drop-down arrow for Template, and select “Tenable Nessus Vulnerability Plugin”.
Edit your Template Name.
Local Python Script should say: “hawk_nessus_vuln”
Local Python Function should say: “hawk_dispatch”
Fill in the Nessus Username and Password.
Enter HAWK API Url. i.e. “https://hawk-data-host:8080/API/1.1”
Enter in the HAWK API Username and Password:
Once finished click button to save your Resource template.
Click button again to save your resource.
Verify that its showing in the Resource Administration Table.
Note
In order for the Data Tier to decrypt and store the information correctly. Check hcpulse.cfg file on engines that are responsible for processing this Pulse Template. Insure hcpulse.cfg has the correct HTTPCredentialSecret value. It should match the “ENCRYPTION_KEY_PLAIN” in config.php located at ‘/var/www/hawk-data/htdocs/API/1.1/config.php’ on the hawk-data (API) server.
3.17. Rapid7 Nexpose Vulnerability Plugin
On the HAWK engine that is responsible for gathering information, enter the following commands:
user@host:# yum -y install hawk-ece-plugin-nexpose
user@host:# yum -y install hawk-ece-plugin-python
user@host:# service hawk-ece restart
On the navigation panel, click on .
In the Resource Administration section, Click on the button.
The Resource Editor opens, as shown:
Enter the Host name of the Resource.
Enter the IPv4 Network IP address for the Resource.
Enter the IPv6 Network IP address for the Resource (optional).
If the Resource is designated as a Compliance Asset, Click on the radio button by “True”, if the Resource is not designated as a Compliance Asset, Click on the Radio button next to “False”.
Enter the Critical value for the Asset. There are five levels which identify the criticality of the asset, which are:
Level 1 - Critical/Sensitive Data (Highly sensitive and critical data)
Level 2 - High (very important data)
Level 3 - Moderate
Level 4 - Low
Level 5 - Very Low
Select the specific Group to which the new Resource is assigned.
At System Type, click on the drop-down arrow and Select “Rapid7 Nexpose”.
Enter additional detailed notes in the Details/Notes section.
Click on tab.
Click on the button.
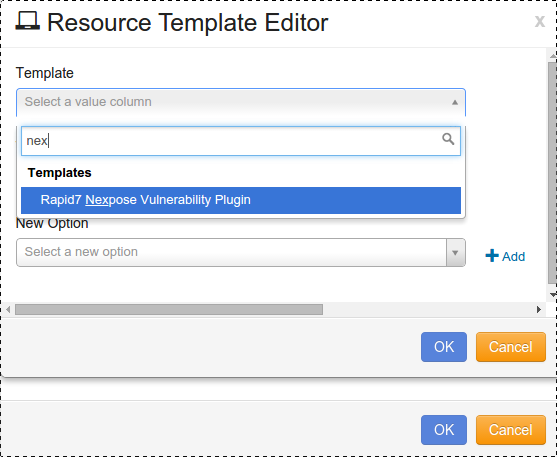
Resource Template Editor will open, as shown:
Click the drop-down arrow for Template, and select “Rapid7 Nexpose Vulnerability Plugin”.
Edit your Template Name.
Local Python Script should say: “hawk_nexpose_vuln”
Local Python Function should say: “hawk_dispatch”
Fill in the Nexpose Username and Password.
Enter the Nexpose API Url. i.e. “https://nexpose.rapid7.com”
Enter HAWK API Url. i.e. “https://hawk-data-host:8080/API/1.1”
Enter in the HAWK API Username and Password:
Once finished click button to save your Resource template.
Click button again to save your resource.
Verify that its showing in the Resource Administration Table.
Note
In order for the Data Tier to decrypt and store the information correctly. Check hcpulse.cfg file on engines that are responsible for processing this Pulse Template. Insure hcpulse.cfg has the correct HTTPCredentialSecret value. It should match the “ENCRYPTION_KEY_PLAIN” in config.php located at ‘/var/www/hawk-data/htdocs/API/1.1/config.php’ on the hawk-data (API) server.
3.18. HAWK Syslog Plugin
Any Syslog message not parsed by HAWK signtures will be processed by this Syslog plugin. Events in HAWK will have generic RFC3164 Alert Names.
Note
If you use this plugin, It is recomended that you tune your syslog service to be confined to only those messages that are required to be remotely logged by your organization. For example, kernel warnings, authentication requests, and the like. Other messages should be locally logged instead.
On the HAWK engine that is responsible for gathering information, enter the following commands:
user@host:# yum -y install hawk-ece-plugin-syslog
user@host:# service hawk-ece restart
3.19. SNMPv1 and SNMPv2c Query Plugin
On the navigation panel, click on .
In the Resource Administration section, Click on the button.
The Resource Editor opens, as shown:
Enter the Host name of the Resource.
Enter the IPv4 Network IP address for the Resource.
Enter the IPv6 Network IP address for the Resource (optional).
If the Resource is designated as a Compliance Asset, Click on the radio button by “True”, if the Resource is not designated as a Compliance Asset, Click on the Radio button next to “False”.
Enter the Critical value for the Asset. There are five levels which identify the criticality of the asset, which are:
Level 1 - Critical/Sensitive Data (Highly sensitive and critical data)
Level 2 - High (very important data)
Level 3 - Moderate
Level 4 - Low
Level 5 - Very Low
Select the specific Group to which the new Resource is assigned.
At System Type, click on the drop-down arrow and Select the proper system type.
Enter additional detailed notes in the Details/Notes section.
Click on tab.
Click on the button.
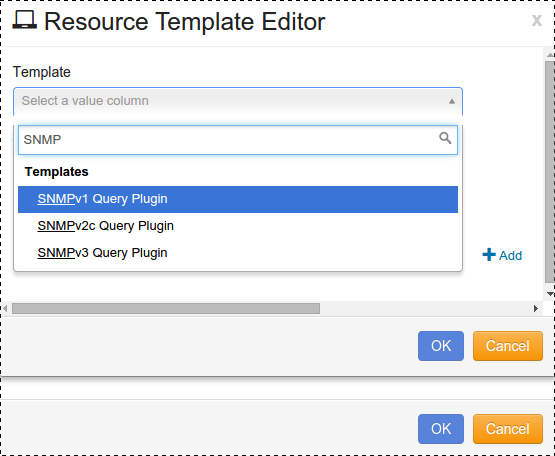
Resource Template Editor will open, as shown:
Click the drop-down arrow for Template, and select “SNMPv1 Query Plugin” or “SNMPv2c Query Plugin”.
Edit your Template Name.
Enter the SNMP Community String.
Enter the Port number.
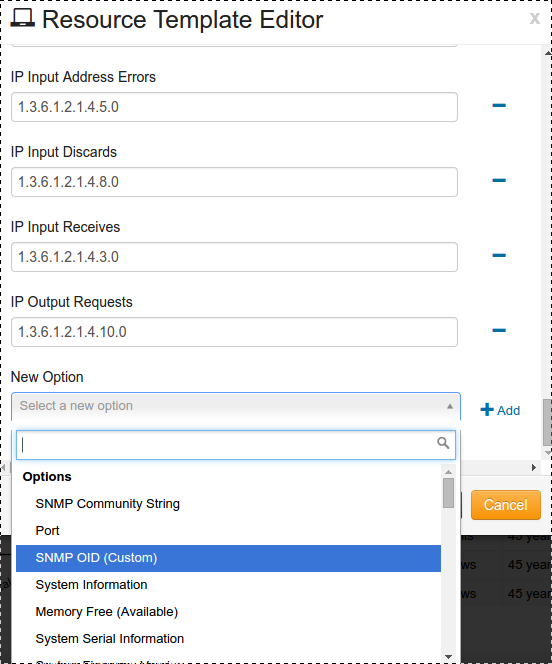
Verify the OID (Object Identifiers) are correct.
Remove or add any OID’s.
20a. To remove a OID click the minus sign to the right of any option.
20b. To add an OID select “New Option” Drop down menu will open select the desired field or select “SNMP OID (Custom)”
Click to add it to the template.
Once the new field is added, enter the OID.
Note
Make sure there are appropriate signatures created to parse out the information requested in the SNMP Template. For more information on creating signatures see Create Custom Signatures
3.20. SNMPv3 Query Plugin
On the navigation panel, click on .
In the Resource Administration section, Click on the button.
The Resource Editor opens, as shown:
Enter the Host name of the Resource.
Enter the IPv4 Network IP address for the Resource.
Enter the IPv6 Network IP address for the Resource (optional).
If the Resource is designated as a Compliance Asset, Click on the radio button by “True”, if the Resource is not designated as a Compliance Asset, Click on the Radio button next to “False”.
Enter the Critical value for the Asset. There are five levels which identify the criticality of the asset, which are:
Level 1 - Critical/Sensitive Data (Highly sensitive and critical data)
Level 2 - High (very important data)
Level 3 - Moderate
Level 4 - Low
Level 5 - Very Low
Select the specific Group to which the new Resource is assigned.
At System Type, click on the drop-down arrow and Select the proper system type.
Enter additional detailed notes in the Details/Notes section.
Click on tab.
Click on the button.
Resource Template Editor will open, as shown:
Click the drop-down arrow for Template, and select “SNMPv3 Query Plugin”.
Edit your Template Name.
Enter the Username and Password.
Enter the Port number.
Verify the OID (Object Identifiers) are correct.
Remove or add any OID’s.
20a. To remove a OID click the minus sign to the right of any option.
20b. To add an OID select “New Option” Drop down menu will open select the desired field or select “SNMP OID (Custom)”
Click to add it to the template.
Once the new field is added, enter the OID.
Note
Make sure there are appropriate signatures created to parse out the information requested in the SNMP Template. For more information on creating signatures see Create Custom Signatures
3.21. Trend Micro Deep Security
Log into the Trend Micro Deep Security manager.
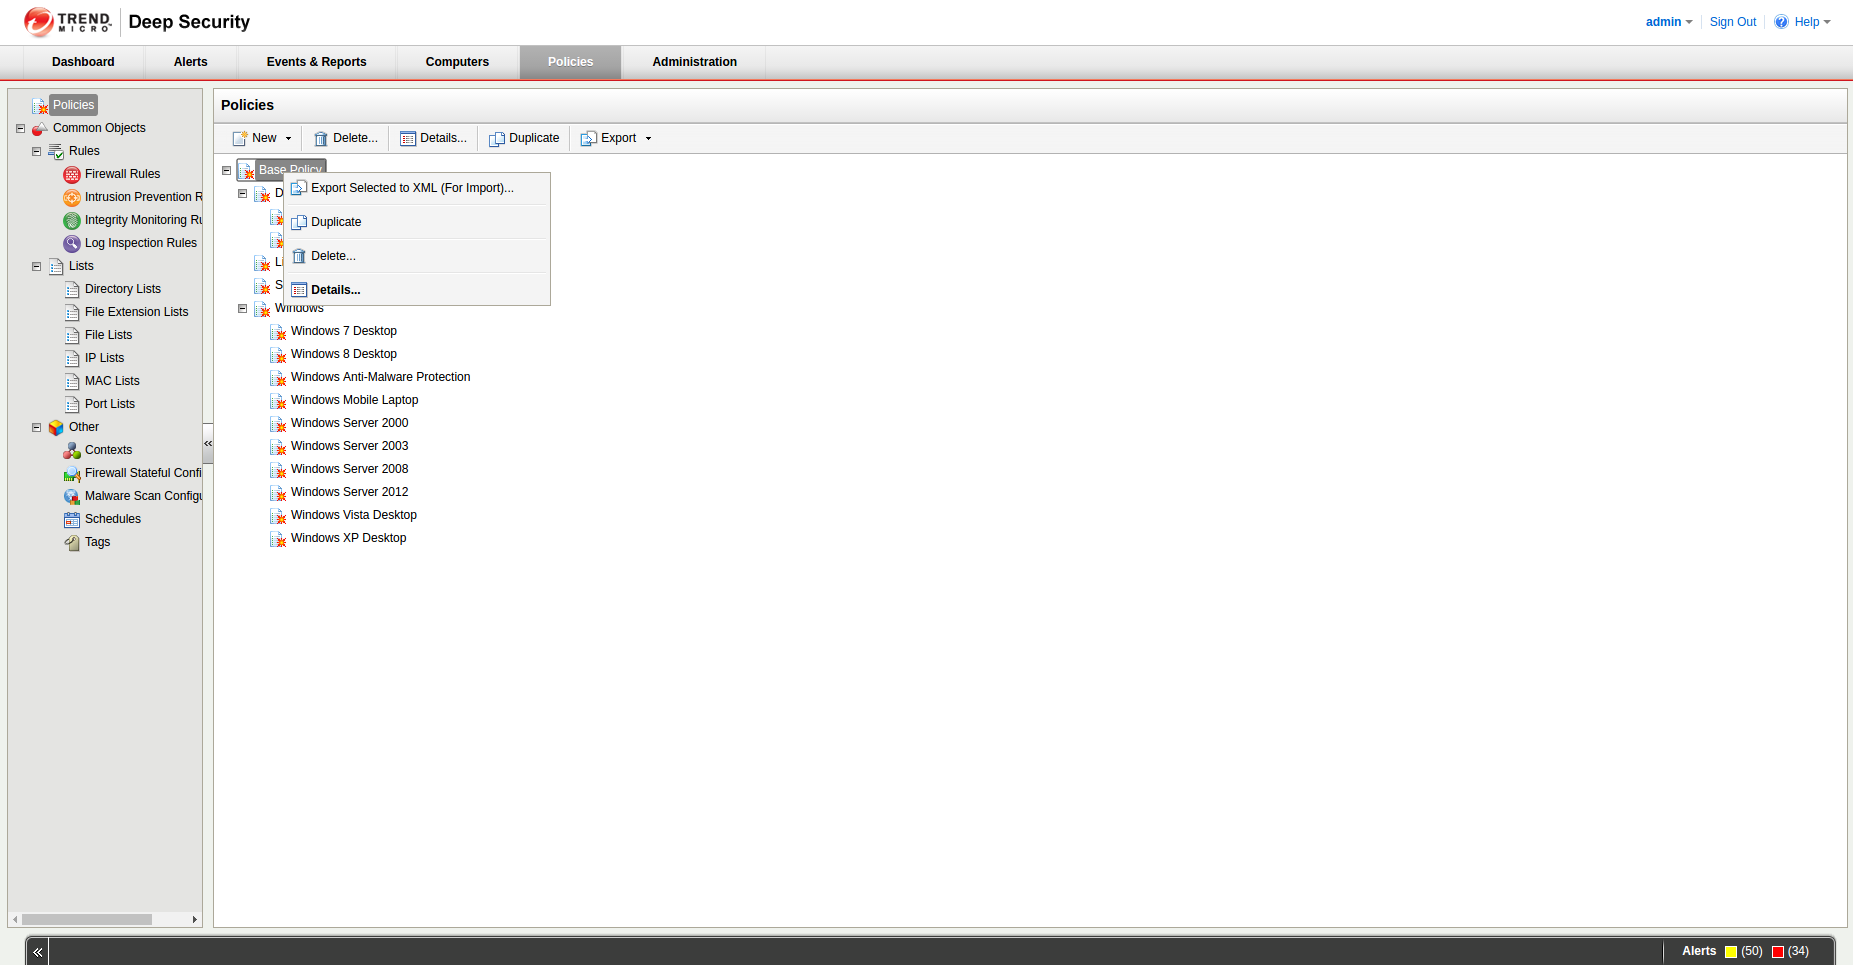
Go to Policies.
Right click on ‘Base Policy’ and choose ‘Details..’
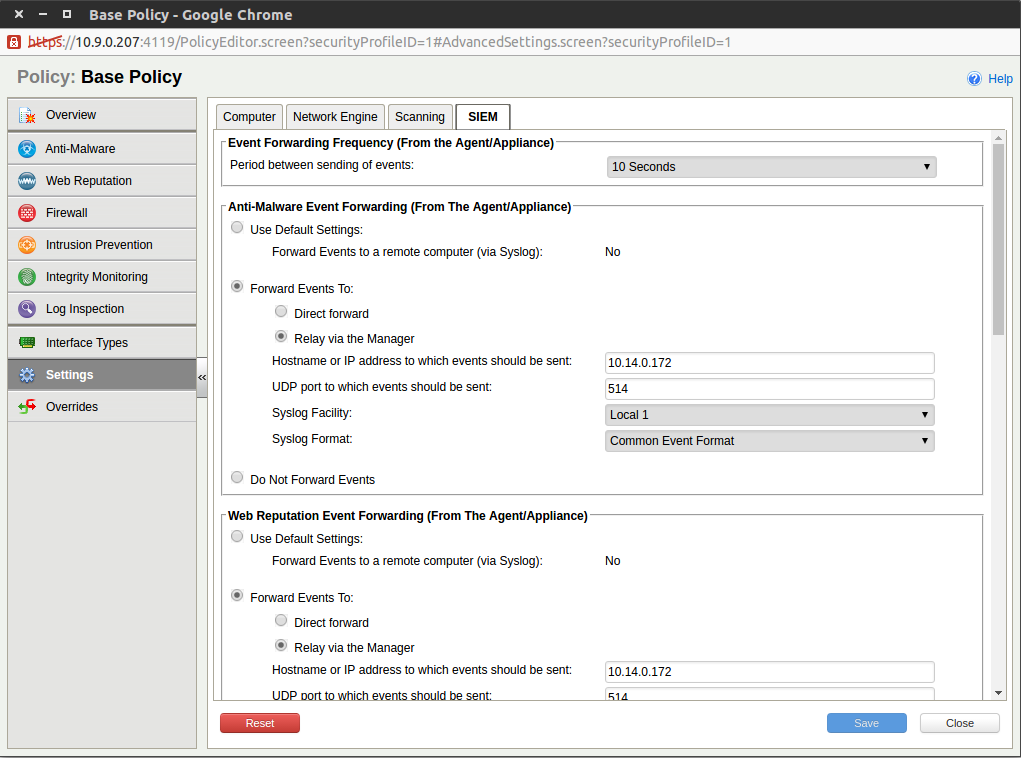
Click on .
- For category Anti-Malware:
Select radio button ‘Forward Events To:’
Select radio button ‘Relay via the Manager’
Enter the Hostname or IP address of the HAWK engine.
Enter ‘514’ for the UDP port.
Set the syslog Facility to ‘Local 1’
Set the syslog Format to ‘Common Event Format’
- For category Web Reputation:
Select radio button ‘Forward Events To:’
Select radio button ‘Relay via the Manager’
Enter the Hostname or IP address of the HAWK engine.
Enter ‘514’ for the UDP port.
Set the syslog Facility to ‘Local 2’
Set the syslog Format to ‘Common Event Format’
- For category Firewall and Intrusion Prevention:
Select radio button ‘Forward Events To:’
Select radio button ‘Relay via the Manager’
Enter the Hostname or IP address of the HAWK engine.
Enter ‘514’ for the UDP port.
Set the syslog Facility to ‘Local 3’
Set the syslog Format to ‘Common Event Format’
- For category Integrity Monitoring:
Select radio button ‘Forward Events To:’
Select radio button ‘Relay via the Manager’
Enter the Hostname or IP address of the HAWK engine.
Enter ‘514’ for the UDP port.
Set the syslog Facility to ‘Local 4’
Set the syslog Format to ‘Common Event Format’
- For category Log Inspection.
Select radio button ‘Forward Events To:’
Select radio button ‘Relay via the Manager’
Enter the Hostname or IP address of the HAWK engine.
Enter ‘514’ for the UDP port.
Set the syslog Facility to ‘Local 5’
Set the syslog Format to ‘Common Event Format’
Click Save.
Allow the base policy to be applied. Event will now be populated in HAWK Dashboards.
