4. Tier 4 Desktop Computer Configuration
4.1. Microsoft Windows 2000, 2003, 2008 Server, Microsoft Windows 7, XP, Vista
4.1.1. Agent-based Installation
Download and install Windows 32bit HAWK Agent as an administrator on the target system.
Edit the hawk_agent.cfg for any specific files, folders or EventLog sources where logging will be required.
Additionally, specify the remote syslog host and protocol meant for communication
Save the configuration file
Close the configuration file; the installer will automatically restart the HAWK Log & Event Collection Agent
Installation is now complete.
Note
To double check the client is running you can check for the ‘’hawk_agent.exe’’ process under Task Manager
Sample configuration below:
#
# HAWK Agent Configuration File
#
# HAWK Network Defense, Inc. - 2007
#

RemoteHost="localhost"
RemotePort="514"
#Remote Service options: TCP, UDP, TCP-SSL
RemoteService="UDP"

# Enable Automatic Log Rotation
LogRotation="0"
# In megabytes
LogRotationSize="5"

EnablePerformance="1"
PerformanceMonitorPollingTimeout="300"

#############################################################################
#
#                        Begin Log File Configuration
#
#############################################################################

# HAWK Log File
#LogFile="C:\Program Files\HAWK\Agent\hawkagentd.log"

# Cerberus FTP Configuration
LogFile="C:\Program Files\Cerberus\logs\cerberus.log"

# Microsoft Windows Firewall
# To enable, open your network connection properties and go to the Advanced tab
# here is a Settings button on the Advanced tab that causes a second property sheet to appear with three tabs:
#       Select: Security Logging
#       Go into Security Logging and switch on logging for both dropped packets and successful connections.
LogFile="C:\WINDOWS\pfirewall.log"
LogFile="C:\WINNT\pfirewall.log"


############################################################
# IIS Configuration
############################################################

# WINNT/2000/2003
#LogDirectory="C:\WINNT\system32\LogFiles\W3SVC1"
#LogDirectory="C:\WINNT\system32\LogFiles\W3SVC2"
#LogDirectory="C:\WINNT\system32\LogFiles\SMTPSVC1"
#LogDirectory="C:\WINNT\system32\LogFiles\SMTPSVC2"


# WinXP
#LogDirectory="C:\WINDOWS\system32\LogFiles\W3SVC1"
#LogDirectory="C:\WINDOWS\system32\LogFiles\W3SVC1"
#LogDirectory="C:\WINDOWS\system32\LogFiles\SMTPSVC1"
#LogDirectory="C:\WINDOWS\system32\LogFiles\SMTPSVC2"


############################################################
# HIDS Configuration
############################################################

# Cimcor CimTrak HIDS Configuration
#LogDirectory="C:\Program Files\Cimcor\CimTrak Server\WTLogs"

# Sophos Anti-Virus Configuration
#LogFile="C:\Program Files\Sophos Anti-Virus\sweep.log"
#LogFile="C:\Program Files\Sopho\AutoUpdate\Logs\aic.log"
#LogDirectory="C:\Program Files\Sophos\Remote Management System\Agent\Logs"
#LogDirectory="C:\Program Files\Sophos\Remote Management System\Router\Logs"
#LogDirectory="C:\WINNT\Profiles\All Users\Application Data\Sophos\Remote Management System\3\Agent\Logs"
#LogDirectory="C:\WINNT\Profiles\All Users\Application Data\Sophos\Remote Management System\3\Router\Logs"

#LogDirectory="C:\Documents and Settings\All Users\Application Data\Sophos\Sophos Anti-Virus\logs"
#LogDirectory="C:\Documents and Settings\All Users\Application Data\Sophos\Remote Management System\3\Agent\Logs"
#LogDirectory="C:\Documents and Settings\All Users\Application Data\Sophos\Remote Management System\3\Router\Logs"

# Sophos Management Server
#LogDirectory="C:\Documents and Settings\All Users\Application Data\Sophos\Remote Management System\3\EMLib\Logs"
#LogDirectory="C:\Program Files\Sophos\Remote Management System\EMLib\Logs"
#LogDirectory="C:\Program Files\Sophos\Enterprise Console\CertificationManager\Logs"

# ClamAV Windows Antivirus Configuration
#LogDirectory="C:\Documents and Settings\All Users\.clamwin\log"


#############################################################################
#
#                       Begin EventLog Configuration
#
#############################################################################

EnableWMIEvents="1"

############################################################
# Microsoft Windows Base Source
############################################################
EventLogSource="Application"
EventLogSource="Security"
EventLogSource="System"


############################################################
# Microsoft Office Source
############################################################
#EventLogSource="Microsoft Office Diagnostics"
#EventLogSource="Microsoft Office Sessions"
Note
You can only send logs to one destination.
4.1.1.1. Reload Configuration
In order to reload any changes in configuration you have to start and stop the service.
Click on .
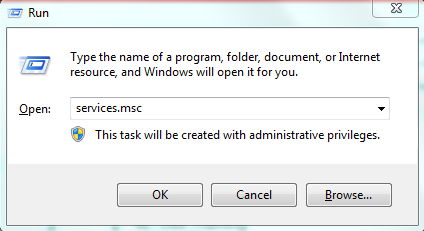
Type in services.msc and click OK.
Find and select “HAWK Local Event Collection Agent” in the list on the right hand side.
Click on Restart the service
Note
Alternatively, You can open an administrative command dialogue and run the commands below:
net stop hawkagent
Then run:
net start hawkagent
4.1.2. Agent-based Upgrade
Download Windows 32bit HAWK Agent as an administrator on the target system.
Open an administrative command dialogue and run the commands below:
net stop hawkagent
HAWKAgentSetup-win32-${version}.exe /S
net start hawkagent
This will replace the existing service with the new updates, while maintaining the existing configuration files.
Note
The /S option will installs the agent in slient mode.
4.1.3. Agent-based Uninstall
Open an administrative command dialogue and run the command below:
net stop hawkagent
Go to
Find and select HAWK Agent (remove only)
Click Uninstall/Chagne
A HAWK Agent Uninstall Confirmation window will open, Click Uninstall.
Note
Uninstalling will leave the HAWK folder in ‘Program Files (x86)’. There are two files that are used to track the files being monitored. If you don’t plan to re-install the HAWK Agent you can remove this HAWK folder.
4.1.4. SNARE Agent
Snare for Windows is a Windows XP, Vista, Windows 2003, Windows 7, 8, 8.1, Windows 2008/2008 R2, Windows 2012/2012 R2 compatible service that interacts with the underlying Windows Eventlog subsystem to facilitate remote, real-time transfer of event log information. Log data is converted to text format, and delivered to a remote Snare Server, remote SIEM server or to a remote Syslog server with configurable and dynamic facility and priority settings.
Configure Snare to send data to HAWK eyeCon 5.0
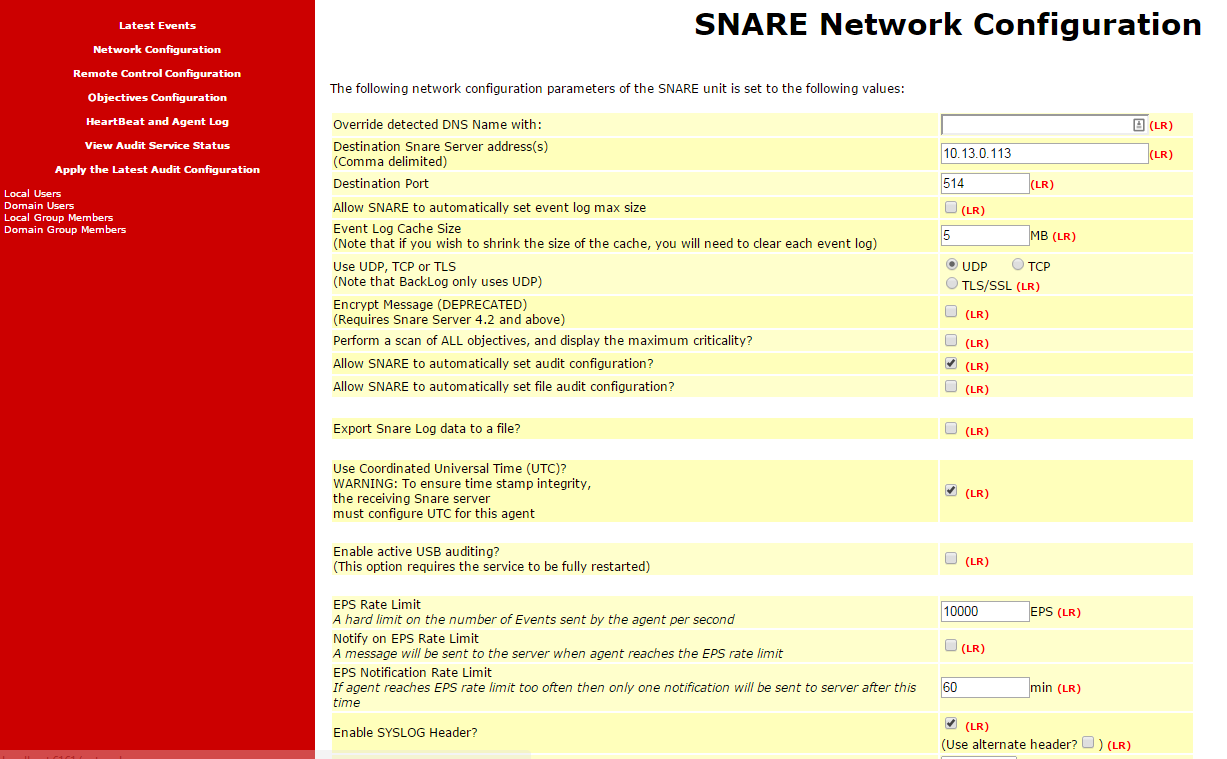
One you install the software, go to Network Configuration section. Configure the Destination Snare Server Address and Destination Port to point to your HAWK Engine address and port. Check Use Coordinated Universal Time (UTC) and Enable Syslog Header in the configuration.
Next we need to change Windows Log Delimiter.
Windows uses by default the tab character to separate the different fields in the log, you will need to change this delimiter and use “,” to allow HAWK eyeCon 5.0 to collect events
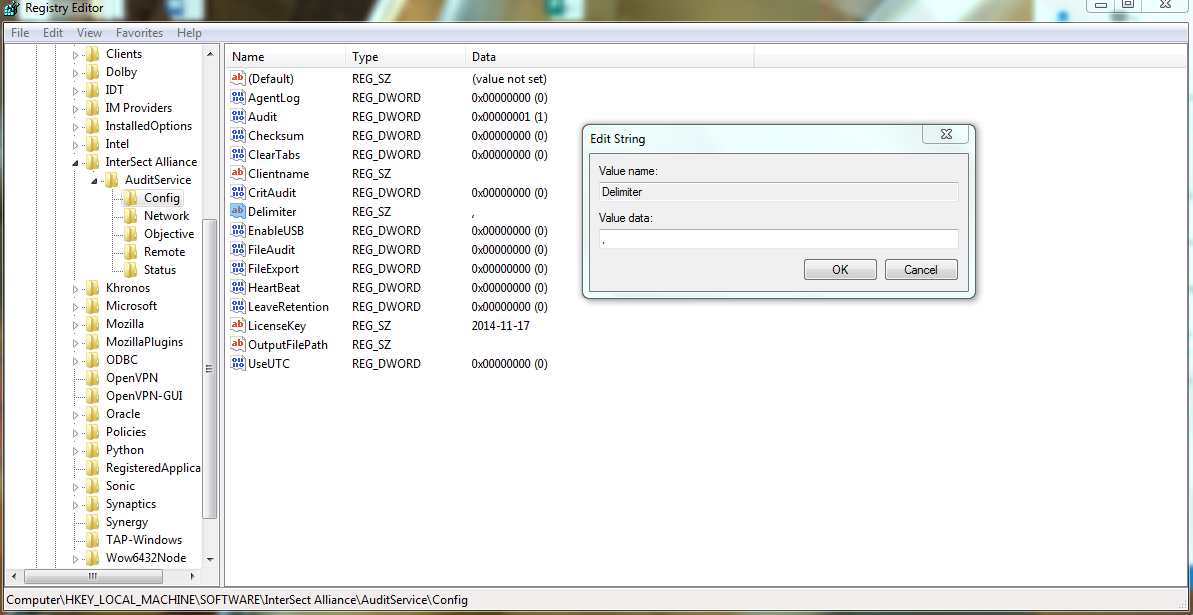
This delimiter can be changed in the Windows registry using the regedit tool.
Navigate to HKEY_LOCAL_MACHINESOFTWAREInterSect AllianceAuditServiceConfig
Double click on Delimiter and change the Value data field from a tab to a comma “,”.
Click OK
Close out of the Windows Registry Editor.
Restart the Snare Service.
Open an administrative command dialogue and run the commands below:
net stop snare
then type in:
net start snare


